
Getting into the Christmas spirit this season doesn’t have to stop at decorating your home or tree. With a few simple supplies, you can add some festive flair to your nails too. Creat your Christmas tree nails with these easy and fun step-by-step tips!
Introduction To Christmas Tree Nails

Festive Christmas tree nail designs are a popular and fun way to celebrate the holiday season. These designs feature the classic symbol of Christmas, the Christmas tree, in a variety of creative and eye-catching ways. From simple and elegant designs to bold and colorful ones, there are endless possibilities when it comes to Christmas tree nail designs.
Some popular Christmas tree nail designs include the classic green and red color scheme, with the Christmas tree as the centerpiece of the design. Other designs incorporate snowflakes, ornaments, and other holiday elements to create a complete winter wonderland on your nails.
When creating Christmas tree nail designs, there are many techniques that can be used, including hand painting, stamping, and even the use of 3D elements such as studs and rhinestones. These techniques can be combined with a variety of nail polish finishes, such as glitter and metallics, to create a unique and festive look.
Overall, Christmas tree nail designs are a fun and creative way to celebrate the holiday season and add some festive cheer to your nails. Whether you prefer a simple and elegant design or a bold and colorful one, there is a Christmas tree nail design that will suit your style and preferences.
Different Types of Christmas Tree Nail Art
a. Glittery Trees
b. Sequined Trees
c. Colorful Trees
d. Christmas Light Trees
A. Glittery Trees:
Glittery Christmas tree nail art is a festive way to spread some holiday cheer. This type of nail art involves using glitter and sparkles to create a beautiful and twinkling effect that will last all season long. The best way to achieve this look is by applying several layers of colored glitters in different shapes and sizes.
For example, you could alternate between larger and smaller circles of glitter to give your nails a unique texture. You can also add other decorations such as stars or snowflakes for an even more festive effect. With all the colors available, you can easily create a look that matches your Christmas outfit perfectly!
B. Sequined Trees:
Sequined Christmas tree nail art is a great way to make your nails sparkle and shine. For this look, you will need to apply sequins of various shapes and sizes to your nails. The key here is to create a balanced design that looks as if the sequins are falling from the sky like snowflakes. You can also add other decorations, such as glittery stars or snowflakes, for an extra special touch. This type of nail art will instantly make your nails look festive and party-ready all season long!
C. Colorful Trees:
Colorful Christmas tree nail art is a great way to get creative during the holiday season. This type of nail art involves painting your nails with different shades of green and red, as well as other bright colors, to create a festive look. You can use polka dots, stripes or even chevron designs for an extra fun touch. Additionally, you can add some gold accents such as stars or snowflakes to make your nails look even more festive. With all the bright colors, your nails will be sure to make a statement this Christmas season!
D. Christmas Light Trees:
Christmas light tree nail art is the perfect way to show your love for the holiday season. This type of nail art involves creating a mini Christmas tree with neon-colored lights on each nail. You can begin by painting your nails in a deep green shade as the background, and then use thin strips of tape to create the outline of the tree. Once the shape is complete, apply small dots of neon colors to represent Christmas lights. To finish off your look, add some small gold accents such as stars or snowflakes for an extra festive touch. Show off your Christmas spirit with this fun and unique nail art design!
These are just some of the different types of Christmas tree nail art that you can try this holiday season. Get creative and have fun experimenting with all the different style possibilities to find one that best suits your personality. Whether you choose glittery, sequined, colorful or light-up designs, your nails will be sure to look festive and party-ready this Christmas season!
Materials Needed To Create An Amazing Festive Christmas Tree Nails
- Base Coat - This is used as a protective layer for the nails and helps the nail polish adhere better.
- Nail Polish - The base color of the design.
- TopCoat - This is used as a protective layer for the nails and helps the design last longer.
- Dotting Tool - This tool is used to create small dots and details in the design.
- Striping Brush - This brush is used to create fine lines and intricate details in the design.
- Nail Art Brushes - These brushes come in a variety of shapes and sizes and are used for creating various details in the design.
- Glitter - Used to add sparkle and shine to the design.
- Rhinestones - These small stones are used to add dimension and texture to the design.
- Nail Stickers - Pre-made designs that can be easily applied to the nails for a quick and easy design.
- Nail Stencils - These stencils are used to create intricate designs with ease.
- Nail Tape - Used to create clean and precise lines in the design.
- Striping Tape - Similar to nail tape, but thinner and used to create even more intricate details.
- Nail Foil - Used to add metallic and holographic effects to the design.
- Nail Decals - Pre-made designs that can be easily applied to the nails for a quick and easy design.
- Nail Art Pen - Similar to a marker, this tool is used to draw and create designs on the nails.
- Nail Polish Remover - Used to remove mistakes or clean up around the edges of the design.
- Cotton Balls - Used with nail polish remover to remove mistakes or clean up around the edges of the design.
- Cuticle Pusher - Used to push back the cuticles and create a clean canvas for the design.
- Cuticle Oil - Used to moisturize and nourish the cuticles.
- Nail Buffer - Used to smooth out the nails and create a polished finish.
- Nail File - Used to shape and shorten the nails.
- Nail Clippers - Used to cut the nails to the desired length.
- Nail Drill - A power tool used to shape and file the nails.
- UV Lamp - Used to cure and dry gel nail polish.
- Gel Nail Polish - A type of nail polish that is cured under a UV lamp for a longer-lasting and durable finish.
- Acrylic Paint - Used for hand-painting designs on the nails.
- Alcohol - Used to clean and prep the nails before applying the design.
- Glue - Used to attach rhinestones, studs, and other 3D elements to the design.
- Matte Topcoat - A topcoat that creates a matte finish for a unique and trendy look.
Step-by-Step Guide to Creating Your Christmas Nail Designs
- Start by preparing your nails. Trim and shape them to your desired length and file the edges.
- Push back your cuticles using a cuticle pusher and apply cuticle oil to moisturize.
- Apply a base coat to protect your nails and allow it to dry completely.
- Apply a base color of your choice. Reds, greens, and golds are classic Christmas colors, but you can also use white, silver, or blue.
- Use a dotting tool or a toothpick to create small dots of different colors for ornaments on your nails.
- Use a striping brush or a nail art brush to create thin lines in contrasting colors for strings on the ornaments.
- Apply glitter on some of the nails for added sparkle.
- Add rhinestones or studs for added dimension and texture.
- Use nail tape or striping tape to create clean and precise lines in your design.
- Apply nail decals or stickers for an easy and quick design.
- Use nail stencils to create intricate designs with ease.
- Add nail foil for a metallic or holographic effect.
- Use a nail art pen or a fine brush to create hand-painted designs on your nails.
- Apply a topcoat to protect your design and allow it to dry completely.
- Finish off with a matte topcoat for a unique and trendy look.
12 Pro Tips for Creating Your Christmas Nail Designs

- Plan your design beforehand and gather all the necessary materials.
- Practice on a nail wheel or a piece of paper to perfect your design before applying it to your nails.
- Use a small amount of polish on your brush to prevent smudging.
- Apply thin layers of polish and allow each layer to dry completely before applying the next.
- Use a toothpick or a small brush dipped in acetone to clean up any mistakes.
- Don't rush the drying process. Allow your nails to dry completely before moving on to the next step.
- Apply a quick-drying topcoat to speed up the drying process.
- Use a cotton swab dipped in alcohol to clean any residue or oils off your nails before applying the design.
- Use a light touch when applying nail art brushes to create precise lines and details.
- Apply a thin layer of glitter to prevent it from clumping.
- Use tweezers to apply small rhinestones or studs for added precision.
- Experiment with different color combinations and designs to create your own unique Christmas nail design.
Showcasing Your Creativity with Variations and Colors
1. Red and Gold -
Create a classic Christmas look with bright red nails paired with golden accents. Use nail art brushes to create thin stripes or swirls of gold on the red base for an eye-catching design. You can also add small rhinestones or studs in gold for extra sparkle and shine.
2. White and Silver -
For a sophisticated and glamorous look, opt for white nails paired with silver accents. Use nail art pens or brushes to create thin lines of silver around the edges of your nails for an elegant design. Add a few small rhinestones in silver for added sparkle.
3. Green and Gold -
Create a festive Christmas-inspired look with green nails and gold accents. Use a dotting tool to create small dots of gold on the green base for ornaments on your nails. You can also use nail art brushes to create thin lines in gold for strings of the ornaments.
4. Red, Green and Gold -
For an eye-catching and festive look, opt for red, green and gold accents on your nails. Use a dotting tool to create small dots of gold and red for the ornaments. Then use nail art brushes to create thin lines in gold for strings of the ornaments. Add a few rhinestones for extra shine.
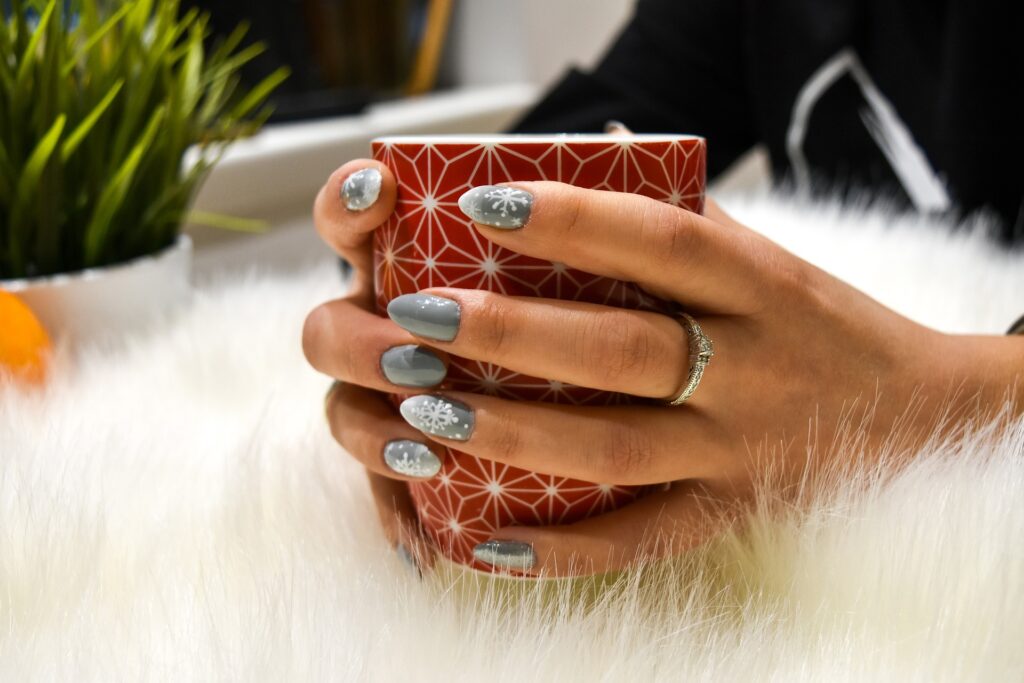
5. Silver and Blue -
Create a beautiful winter-inspired look with silver and blue nails. Use nail art brushes to create thin lines of silver on the blue base for an eye-catching design. You can also add small rhinestones or studs in silver for extra sparkle and shine.
6. Red, White and Silver -
For a classic look, opt for red nails paired with white and silver accents. Use nail art brushes to create thin stripes of white and silver on the red base for an eye-catching design. You can also add small rhinestones or studs in silver for extra sparkle and shine.
7. Glitter -
For an extra sparkly look, opt for glittery nails. Use a thin brush to apply glitter on your base coat in a sweeping motion for maximum sparkle. You can also use tweezers to precisely place rhinestones or studs for added bling.
8. Nude and Gold -
Create a subtle vintage look with nude nails paired with gold accents. Use a thin brush to apply small dots of gold on the nude base for an elegant design. You can also use tweezers to place rhinestones and studs in gold for extra shine and sparkle.
9. Metallic Nails -
Go for a trendy and sophisticated9 look with metallic nails. Use thin brush to create thin lines in silver, gold or rose gold for a unique design. You can also add small rhinestones and studs for an extra touch of glam.
10. Red, White and Blue -
Create a patriotic look with red, white and blue accents on your nails. Use a dotting tool to create small dots of white and blue on the red base. You can also use nail art brushes to create thin lines in red, white and blue for stripes or swirls. Add a few rhinestones or studs for extra sparkle.
11. Snowflakes -
Create a winter-inspired look with snowflake designs on your nails. Use nail art pens or brushes to create thin lines for the snowflakes and add glitter for extra sparkle. You can also use tweezers to precisely place small rhinestones or studs for added bling.
12. Purple and Silver -
For a subtle yet sophisticated look opt for purple nails paired with silver accents. Use nail art pens or brushes to create thin lines of silver around the edges of your nails for an elegant design. Add a few small rhinestones or studs in silver for extra sparkle and shine.
13.Yellow, green and red:
You can always create a festive look with yellow, green and red accents. Use a dotting tool to create small dots of yellow, green and red for a cheerful design. You can also use nail art brushes to create thin lines in these colors for stripes or swirls. Add a few rhinestones or studs for extra sparkle and shine.
14.white, sliver, black and red:
The season, you can always create an edgy look with white, silver, black and red accents. Use a thin brush to apply small dots of black on the white base for a dramatic design. You can also use tweezers to place rhinestones and studs in silver or red for extra shine and sparkle.
No matter what color combination you choose, these Christmas nail designs are sure to addI.P to your holiday look! Have a holly jolly Christmas and be sure to add some festive sparkle to your nails for a glamorous finish!
Top 15 Don'Ts Of Christmas Tree Nail Art Design

Nail art has become an increasingly popular way to express yourself and make a statement. Christmas tree nail art designs are no exception! Whether you choose silver, gold and blue for a winter-inspired look, or bold colors like red, white and blue for a patriotic finish – there is sure to be something perfect for the season.
When it comes to creating an eye-catching Christmas tree nail art design, there are a few things you should definitely avoid. Here are our top 15 don’ts of Christmas tree nail art design:
1. Don’t use too many colors –
Keep the design simple and elegant by limiting the color palette to three or four shades. Too many colors will create an overly busy look that won’t be as effective.
2. Don’t use too much glitter –
A little bit of sparkle can add a nice touch to your design, but don’t go overboard with it. Too much glitter can make the design look gaudy and overdone.
3. Don’t forget to seal your work –
After you’ve finished your design, make sure to use a top coat or sealant to keep it looking fresh and vibrant.
4. Don’t choose colors that clash –
Choose colors that harmonize with each other, rather than clashing shades. This will ensure that your design looks cohesive and professional.
5. Don’t forget to practice –
Before you start your design, practice on a few spare nails or a piece of paper. This will help you get familiar with the technique and ensure that your finished design looks perfect.
6. Don’t use too many decorations –
A few simple decorations like stars or snowflakes can add a nice touch to your Christmas tree design, but don’t go overboard.
7. Don’t forget the details –
Be sure to add small details, such as a few twinkling lights or sparkles, to really make your design stand out.
8. Don’t be afraid of bold colors –
If you want to make a statement with your Christmas tree nail art design, don’t be afraid to use bright, bold colors.
9. Don’t forget to apply a base coat –
Before you start your design, apply a clear base coat to protect your nails and help the colors pop.
10. Don’t overwork the design –
If you want to keep your design looking neat and professional, don’t rush it or try to add too much detail. Take your time and work slowly for the best results.
11. Don’t forget to use a brush –
A nail art brush can help you create smooth, even lines when painting your design.
12. Don’t go too small –
When creating a Christmas tree nail art design, it’s important to keep the size of your tree in proportion to your nails.
13. Don’t be afraid to experiment –
Try different shapes, sizes, and colors until you find the perfect combination for your design.
14. Don’t forget to use a topcoat –
A topcoat will help protect your design and make it last longer.
15. Don’t forget to have fun –
Creating Christmas tree nail art designs can be a great way to express yourself and get creative. So don’t forget to have fun with it!
Conclusion
Christmas tree nails have become a popular trend during the holiday season and are an easy way to add some festive cheer to your appearance. With so many options available, from simple single-color designs to complex creations with intricate details – you’re sure to find something perfect for any occasion. But in order to get the most out of your Christmas tree nail design, there are a few things you should keep in mind.
Make sure to use colors that complement each other, limit your glitter usage and remember to seal your work with a topcoat or sealant. Also, practice on spare nails or paper before starting your design and don’t be afraid to experiment with different shapes and sizes.
Even with these tips in mind, however, Christmas tree nails can still be a bit tricky to pull off. That’s why it helps to have an experienced nail technician on hand who can guide you through the process and ensure that your design looks perfect. With their expertise, they can take your vision and turn it into reality.
1 commento
hi!,I really like your writing so much! percentage we communicate
extra about your article on AOL? I need an expert in this house to solve my problem.
May be that is you! Having a look forward to look you.